


 Hello Crafty Friends!!
Larissa here today to share some SWEET Projects as part of the FUN Collaboration Week with our talented friends at Picket Fence Studios and My Sweet Petunia!! They have adorable, creative, whimsical and beautiful stamps to use along with dies to match and don’t forget about AMAZING MISTI Stamping Tool that has been a STAPLE of mine since I started using it! It’s pretty amazing too!! Let’s get started!!
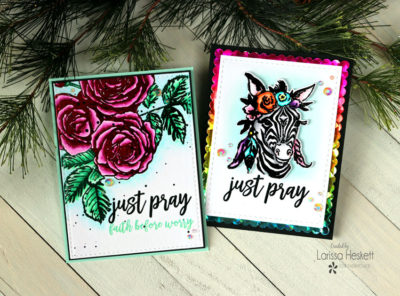
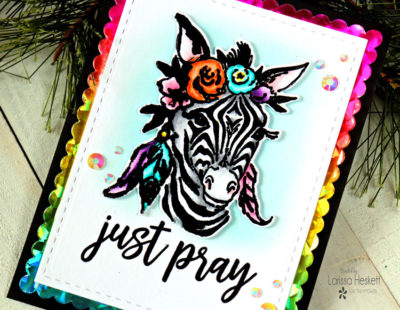
Just Pray Card
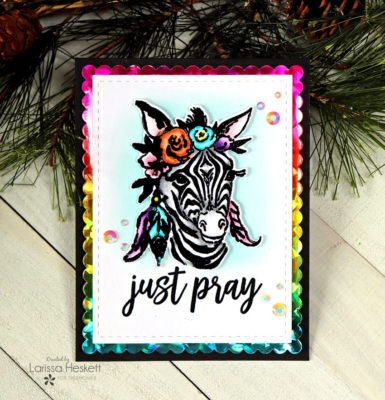
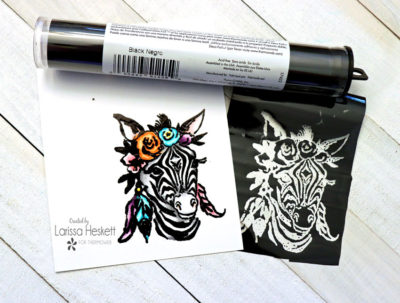
For my First Card, I started by Stamping and Embossing the SWEET Boho Zebra Image!! Zebras have long been a FAVORITE animal of mine and I just LOVE this Image and the MANY options that it has for many occasions of Cards!!
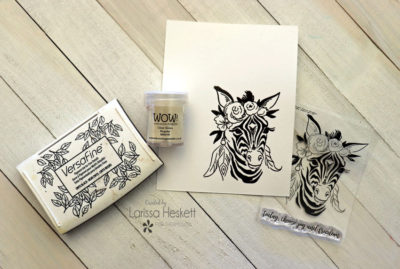
I KNEW I wanted to Foil this Image to really make it POP off the Card so Stamping and Embossing the Image first makes it EASY!! I Stamped the Boho Zebra Image with Versa Fine Black Onyx Ink using my Mini MISTI Stamping Tool so I was able to stamp the image more than once for a BOLD Impression!! Then I Embossed it using WoW Clear Gloss Embossing Powder!! I’ve also found that its easier to Color the Image at this point as sometimes the Copic Markers and Dull the Shine of the Foil if you wait to color after you’ve foiled, but either way you decide to do it the results are still just as STRIKING!!
Now for the Color
After I colored the Stamped and Embossed Boho Zebra Image I used Copic Markers to color it in ( Zebra: N1, N3 & N5 Ears and Nostrils: R20 Flowers & Feathers: V00, V14, V09, BG00, BG45, BG49, RV00, RV11, RV34, YR00, YR02, YR18, Y11 & YR23) Then I cut a small piece of Black Deco Foil large enough to cover the Image and placed it over the image and ran it through my Laminating Machine!! For Fine detail Images, I’ve found its best to place the setting on 1 as to not distort the image!! SWOON!! Pulling back the Foil Sheet to reveal the Foiled Image is my FAVORITE part of the process!! I used the coordinating Die to Die Cut it out and added some Gina K Designs Foam Squares to the back to POP it up off the Card Panel!!
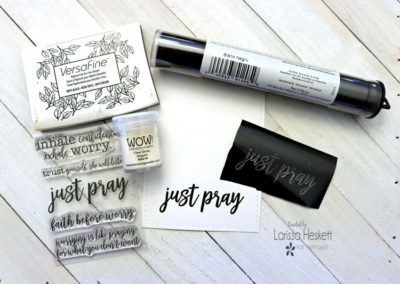
Next, I wanted to create the Panel for the Card!! I knew I wanted to use the Just Pray Sentiment and I wanted it to match the Foiled Image so I used the Mini MISTI and Stamped my Sentiment towards the bottom of my Panel again using Versa Fine Black Onix Ink and WoW Gloss Clear Embossing Powder!! I again cut a Piece of Black Deco FOil large enough to cover my Sentiment and ran it through my Laminating Machine again using the 1 setting as to not distort the Sentiment!!
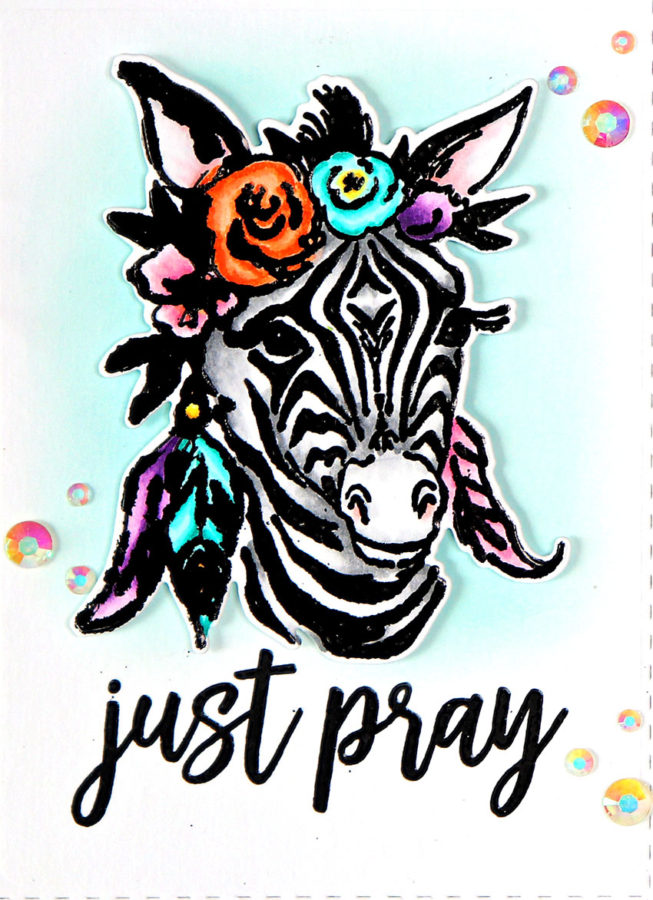
I added some Distress Oxide Ink in Tumbled Glass to the Top part of the Panel to add some color behind the Image!! Then added some Pretty Pink Posh Iridescent Jewels for some SPARKLE using some Zots Bling Adhesive Dots!!
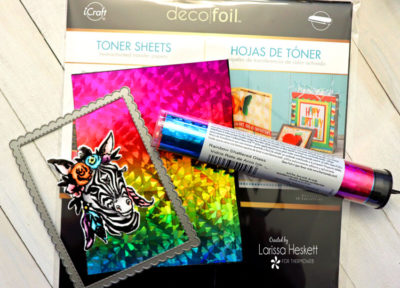
Next, I wanted to create a Frame for my Design!! I wanted the colors I used for the Flowers and Feathers to coordinate so I decided to use the Rainbow Shattered Glass Deco Foil and Foil it onto some Deco Foil Toner Sheets!! Once I ran it through my Laminating Machine I used a Scalloped Frame to Die Cut it out for my Frame!! I just LOVE the finished results!!
Products Used:
Therm O Web:
Rainbow Shattered Glass Deco Foil
Deco Foil Transfer Sheets in Black
Deco Foil Toner Sheets
Laminating Machine
Zots Bling Adhesive Dots
Memory Tape Runner XL
Gina K Designs Luxury White Cardstock
Gina K Design Black Onyx Cardstock
Gina K Designs Foam Squares
Other:
Picket Fence Studios Boho Zebra Stamp Set
Picket Fence Studios Exhale Worry Stamp Set
Mini MISTI Stamping Tool
NND Frames & Flags Die Set
Copic Markers
Pretty Pink Posh Iridescent Jewels
WoW Clear Gloss Embossing Powder
Versa Fine Black Onyx Ink
Distress Oxide Inks in Tumbled Glass
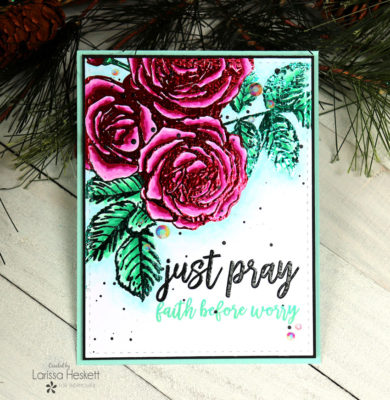
Roses Deco Foil Card
For my Second Card, I created a BEAUTIFUL Two-Toned Foiled Card!! I LOVE being able to use more than one Color of Foil on my Stamped and Transfer Gelled Images!! The results are just AMAZING and it’s so EASY to do!!
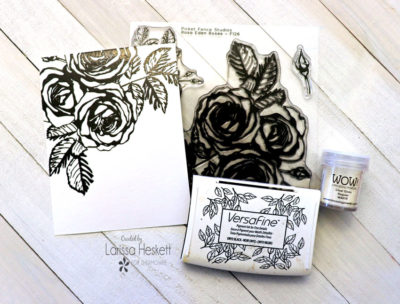
I KNEW I wanted to Foil this Image using 2 different colors to really make it POP off the Card so Stamping and Embossing the Image first makes it EASY!! I Stamped the Rosa Eden Roses Image with Versa Fine Black Onyx Ink using my Mini MISTI Stamping Tool so I was able to stamp the image more than once for a BOLD Impression!! Then I Embossed it using WoW Clear Gloss Embossing Powder!! I’ve also found that its easier to Color the Image at this point as sometimes the Copic Markers and Dull the Shine of the Foil if you wait to color after you’ve foiled, but either way you decide to do it the results are still just as STRIKING!!
Let’s Add Some Foil
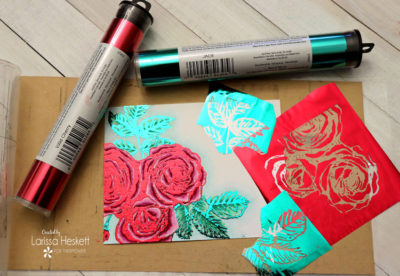
I used Copic Markers to color it in (Roses: RV52, RV63, RV66 & RV69 Leaves: G00, G02 & G17 Background: BG0000, BG00 & BG10) Next I cut the pieces of Jade Deco Foil large enough to cover the Leaves and some Wild Cherry Deco Foil large enough to cover the Rose Images!! I ran it through my Laminating Machine!! For Fine detail Images, I’ve found its best to place the setting on 1 as to not distort the image!! SWOON!! Pulling back the Foil Sheet to reveal the Foiled Image is my FAVORITE part of the process!!
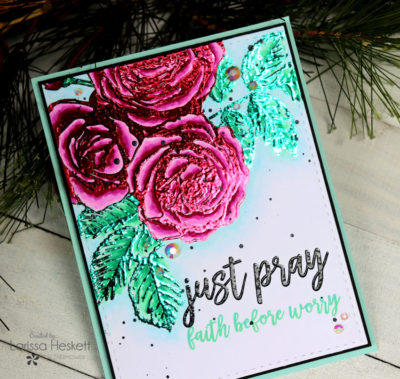
I Stamped and Embossed the Just Pray Sentiment and then Stamped the second Sentiment using some Distress Oxide Inks in Tumbled Glass and Cracked Pistachio!! Using the Mini MISTI Stamping Tool makes the process of creating your own ink color SO EASY!! It blends PERFECTLY with the Copic Colors I used to color in the Leaves!! I added some Distress Paint Splatters in Black Soot and a Few Pretty Pink Posh Iridescent Jewels for some SPARKLE using some Zots Bling Adhesive Dots to finish off the Design!!
Products Used:
Deco Foil Transfer Sheets in Jade
Deco Foil Transfer Sheets in Wild Cherry
Deco Foil Toner Sheets
Laminating Machine
Zots Bling Adhesive Dots
Memory Tape Runner XL
Gina K Designs Luxury White Cardstock
Gina K Design Black Onyx Cardstock
Gina K Designs Foam Squares
Other:
Picket Fence Studios Rosa Eden Rose Stamp Set
Picket Fence Studios Exhale Worry Stamp Set
Mini MISTI Stamping Tool
NND Frames & Flags Die Set
Copic Markers
Pretty Pink Posh Iridescent Jewels
WoW Clear Gloss Embossing Powder
Versa Fine Black Onyx Ink
Black Soot Distress Paint
Distress Oxide Inks in Tumbled Glass & Cracked Pistachio
So there you have it some SWEET Card Ideas that Pack a Punch in both Dimension and Shine!! I hope you feel INSPIRED and that you CAN’T WAIT to Combine Products from both of these AMAZING Companies!!
THANKS SO MUCH for stopping by today and STAY TUNED for LOTS of FUN as we SHARE LOTS of ideas this week during the Picket Fence Studios & Sweet Petunia Collaboration Week!!
Thanks so much for stopping by today!! We would love to see what YOU create with the Deco Foil Products – be sure to use #decofoil and #thermoweb on Social Media!!

Be sure to stop by the Picket Fence Studios Blog as well as the My Sweet Petunia Blog for more ideas and inspiration and chances to WIN!
Sue D
August 7, 2019 at 8:21 am (5 years ago)So pretty and colorful!
Mary Holshouser
August 7, 2019 at 8:40 am (5 years ago)The zebra is fantastic. Great projects.
thanks for sharing
txmlhl(at)yahoo(dot)com
trainwithmeghan
August 7, 2019 at 9:33 am (5 years ago)Incredible zebra and florals! I love the shimmer!
Sharon Gullikson
August 7, 2019 at 10:29 am (5 years ago)Your zebra is A DORE A BLE!!!!!
Denise Bryant
August 7, 2019 at 10:48 am (5 years ago)Love these collaboration projects! Awesome products!
Andre M.
August 7, 2019 at 3:56 pm (5 years ago)Gorgeous cards, that zebra is just divine!
Vicki Kroll
August 7, 2019 at 4:37 pm (5 years ago)Two great projects with lots of pizzazz. Like all the shimmer and shine in the background of the Zebra.
mjmarmo
August 7, 2019 at 8:41 pm (5 years ago)Such an inspiring array of projects! Love the inspiration!
Karen @ MisplacedMojo.com
August 7, 2019 at 8:58 pm (5 years ago)Both cards are amazing, but I LOVE the floral card!!! Stunning!