


Title; Flock to It – One of the Latest (and Greatest) Additions to the Deco Line from ThermOWeb
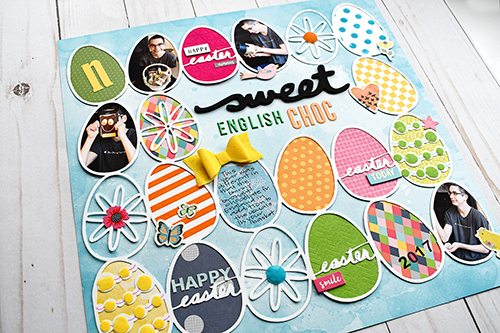
Today I, Suzanna, am sharing with you one of my projects that were on display at Creativation 2019 in sunning Arizona. It was created using one of fifty new products that were released at Winter Creativation!

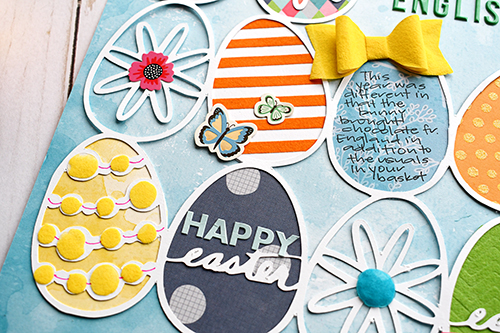
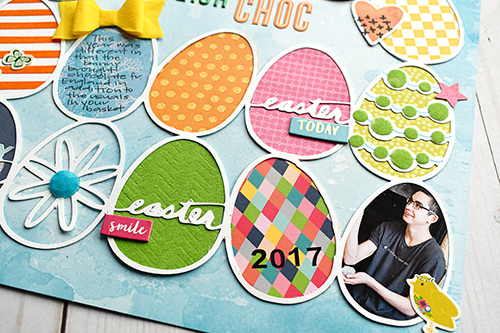
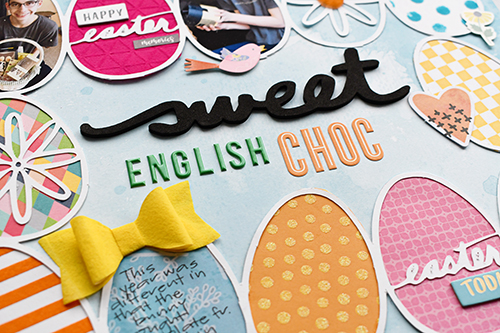
One of the MANY great things that ThermOWeb is introducing at Creativation 2019 is Deco Foil Flock Transfer Sheets! This is some seriously FUN product to add dimension and texture to your paper crafting projects! I have used Deco Foil Flock in five, yes, FIVE, different ways on this Easter layout and I cannot wait to share with you the tips and tricks I have learned at getting your best flock on!
I will share the “how to’s” here, but honestly, it’s easiest to see it in action so be sure to head over to the ThermOWeb YouTube channel for a tutorial/process video.
Project Supplies:
Deco Foil™ White Foam Adhesive
Gina K. Designs Permanent Adhesive Dot Runner
iCraft Ultra Bond Adhesive 2 fl oz
Rebekah Meier Designs Mixed Media Art Tape
Rebekah Meier Designs Mixed Media Adhesive Sheets 9″ x 12″

Deco Foil Transfer Gel Flocked Egg Instructions and Tips:
- Use Purple Tape to secure a stencil of your choosing to a piece of white cardstock.
- Use a brush or old credit/store card to spread a thin, even layer of Deco Foil™ Transfer Gel over the stencil, being sure to wipe any excess back into the jar.
- Set aside to dry for at least an hour, or until the transfer gel has dried clear.
- Cut a piece of the Deco Foil Flock slightly larger than the design and place flock (color side face down) on design.
- Place inside a folded piece of parchment paper and run through the hot laminator.
- Once cool, peel away flock sheet to reveal flocked design.
Flock Striped Egg Instructions and Tips:
- Cut a piece of white cardstock that will be the base or background of the egg.
- Cut a small piece of a Rebekah Meier Designs Mixed Media Adhesive Sheet that will provide sufficient coverage for your stripes.
- Peel of one of the two sides of backing from the adhesive sheet and apply flock color of choice with color side face down onto the adhesive sheet.
- Run the adhesive back flock through your manual die cut machine several times (a shim may be necessary) in order to make sure the Deco Foil Flock has stuck to the adhesive.
- Cut strips with a paper trimmer or ruler and xacto knife of the desired width.
- Peel of the remaining adhesive backing on the Mixed Media sheet and adhere the flocked strip to the backing cardstock.
- Remove flock backing to reveal the colored flock.
- Cut base/background to the desired shape, in this case, like an egg.
Embossed Flocked Foam Egg Instructions and Tips:
- Create foam design using a punch, die-cutting machine, or an electronic cutter. Cut a piece of flock slightly larger than the design.
- Peel paper liner off the front side of foam design to expose adhesive.
- Place exposed adhesive onto the colored side of the flock and place this in an embossing folder. Run this through a manual die cutting machine to apply pressure.
- Peel off foam design from the flock.
- Apply to the project. Once stuck to the project THEN remove remaining foam liner in order to maintain the shape of the item better.
Flocked Bow Instructions and Tips:
- Cut strips of Rebekah Meier Designs Mixed Media Art Tape long enough for the length of the bow die pieces.
- Place the adhesive side of the Mixed Media Art Tape onto the colored side of the flocking that has been cut to the size of the tape.
- Place your die on top of Art Tape backed flock and run the appropriate “sandwich” through your manual die cut machine, this will both cut the desired shape and apply the necessary pressure to ensure a good stick of the flock.
- Use adhesive to construct the bow pieces.
Flocked Zots Instructions and Tips:
- Remove the clear protective coating from one side of the Zot (of any size) – you need to do this as quickly and cleanly as possible to preserve the roundness of the Zot. I liken it to pulling off a bandage – quick.
- Put the exposed adhesive onto your project with the remaining clear plastic facing up.
- Remove the second piece of clear plastic.
- Place flocking over the Zot and brandish with tool/palate knife making sure to rub across and not push down.
- Quickly lift flocking sheet up.
It’s much easier to understand some of the steps and instructions by watching what I do. You can do that then see how the remainder of the layout comes together here;
Once you have all those fun flocked eggs, use some iCraft Ultra Bond Adhesive 2 fl oz to back a digital cut file. That’s the hardest part of the process but the most fun! Stickers and die cuts sprinkled here and there finish off the layout nicely!
I cannot wait for the Deco Foil Flock Transfer Sheets to become available for purchase and see what you are inspired to do with it!
-Suzanna

Don’t miss a chance to get yourself entered to win our National Craft Month Giveaways!
Each week this month we’ll offer two prizes a week for you to enter to win!
CLICK HERE for all the details!

And shop with us this month and receive a FREE GIFT with ALL orders over $31!
The FREE GIFT is a surprise but we promise you’ll love it!
Shop online at http://www.thermowebonline.com
Sharon Gullikson
March 6, 2019 at 12:05 pm (5 years ago)I would love to win a prize, but don’t know how to enter…thanks.