


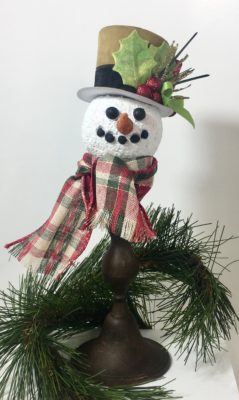
Hello friends! Today I’m sharing a cute home decor piece that I absolutely love! I hope this will give you the inspiration to create some great holiday pieces for your home with the new colors of Deco Foil Flock to inspire you.
Snowman Decor
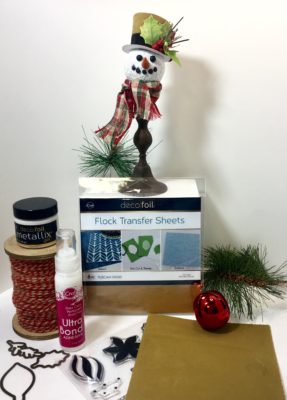
Snowman Supplies:
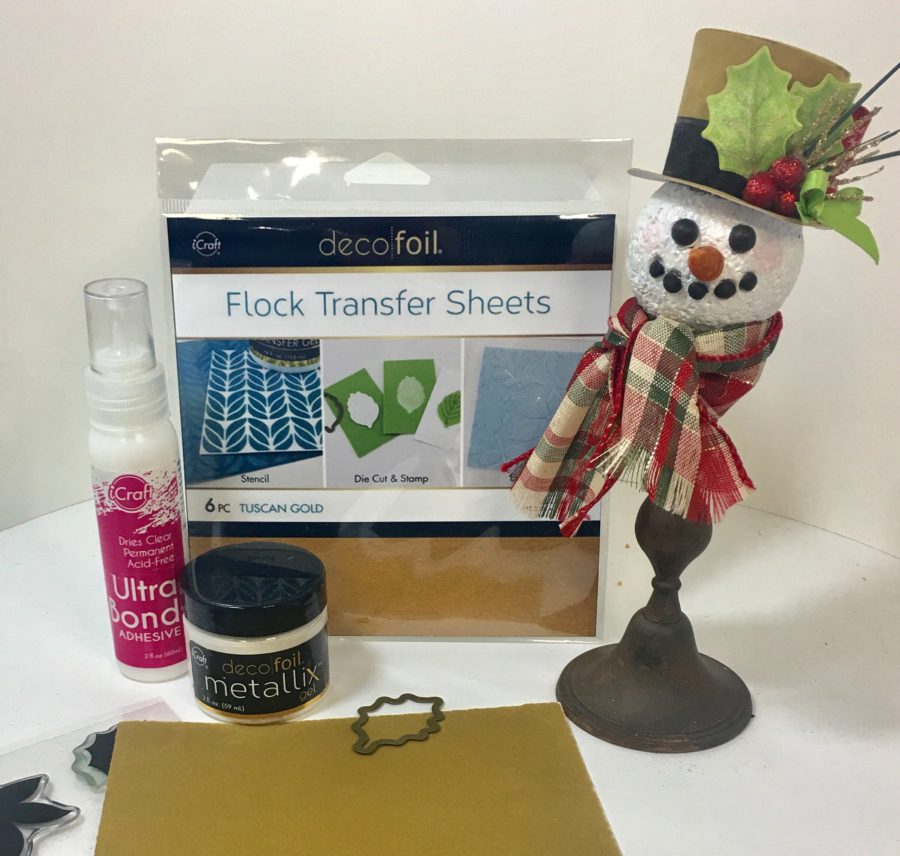
Deco Foil Flock Transfer Sheets – Tuscan Gold
Metallix – White Pearl
iCraft UltraBond Liquid Adhesive
Deco Foil White Foam Adhesive
Gina K. Designs StampNStencil Set – Wishing You Joy
Gina K. Designs Die Set – Wishing You Joy
Gina K. Designs Glitz Glitter Gel – Red Velvet
Gina K. Designs Die Set – Single Stitch Design
Other Supplies: Candlestick, chalk paint, foam ball, polymer clay, foam cone, toothpicks, inks and blending tool or brush, die-cutting machine, ribbon, foam holly berries, hot glue, and a glue gun.
Snowman Decor Tutorial
STEP ONE:
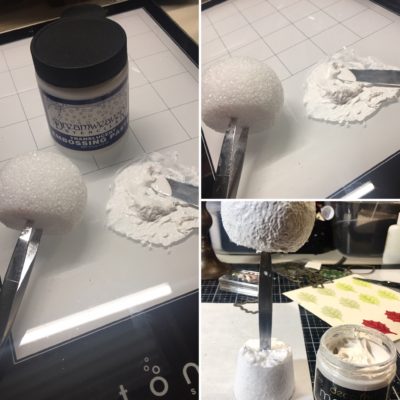
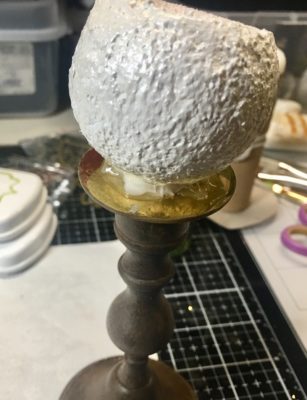
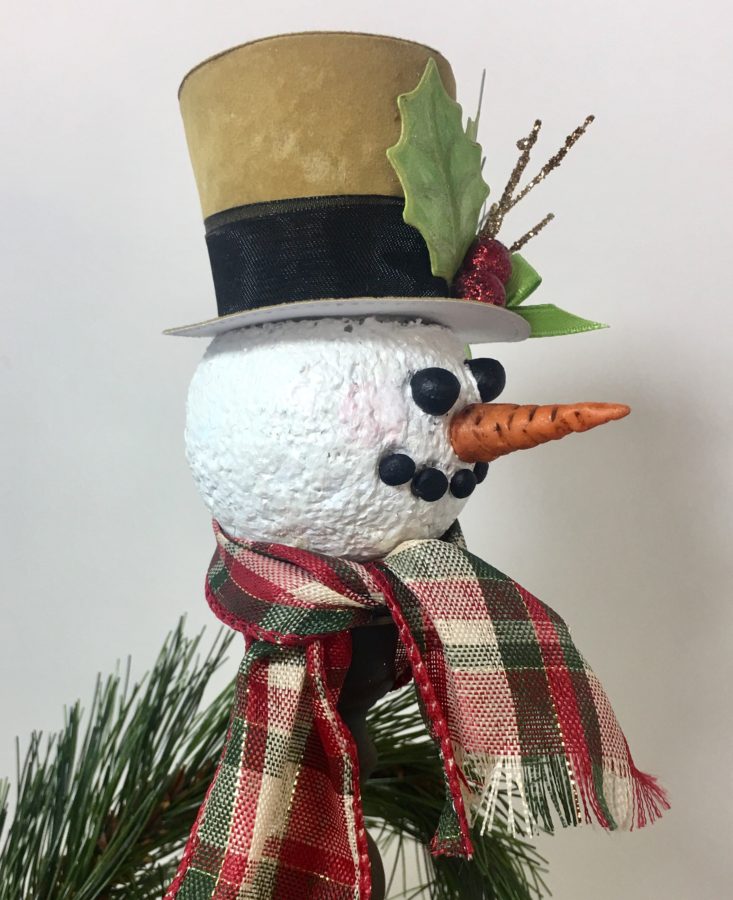
To begin, slice a bit from the foam ball so that the hat will sit flush. I used a thin nail file and just sawed right through it. You will want to choose the foam ball size to coordinate with your candlestick. This was a smaller size candlestick so the entire piece is a little smaller. When I make these on a large wood candlestick I use a 4-5″ foam ball. This one is a 2″ ball. To cover over the styrofoam look, use a modeling paste, texture paste, embossing paste or any similar product and spread it over the entire surface. The paste I grabbed was translucent so I had to add white paint (if yours is opaque you can skip this step). Once the paste is completely dry, paint a thin layer of Pearl White Metallix over the entire surface to give a metallic sheen to your snowman.
Hint: I find candlesticks at thrift shops and pick them up for a song. Usually, the ones I find are a dingy brass or ugly wood. Add a bit of chalk paint and wax and voila you have a brand new candlestick! The one in the sample is painted brass.
STEP TWO:
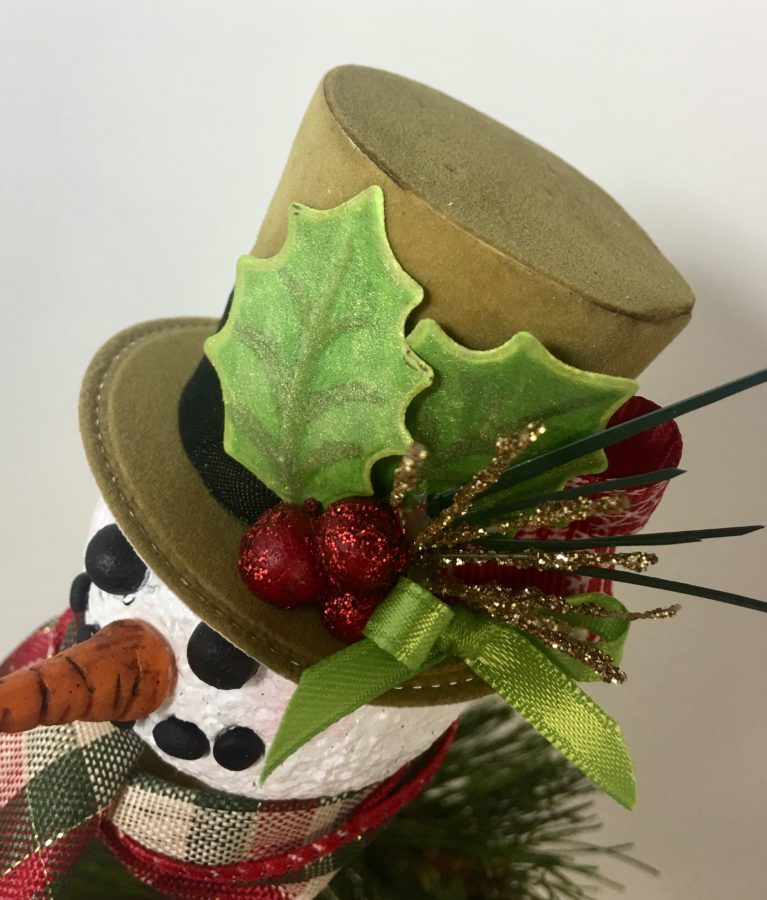
Now we get to create the hat. This is the most exciting part for me. I’ve been creating these candlesticks for a couple of years now but have had a heck of a time trying to find snowman hats in the sizes I want them. Now that I have access to Flock Transfer Sheets I am stoked! I am going to use the Flock in a bit of a different way.
For normal use, you would use an adhesive (my fav for the Flock is the Foam Adhesive Sheets) and press the Flock Sheet onto the adhesive and then pull off, leaving a flocked surface. For this project however we will use it this way:
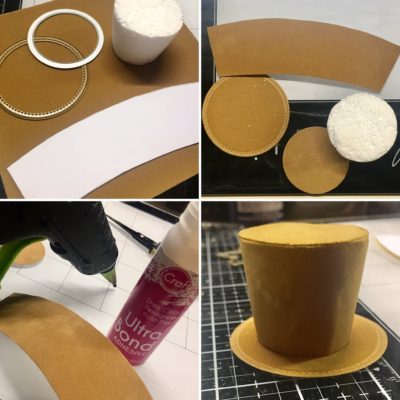
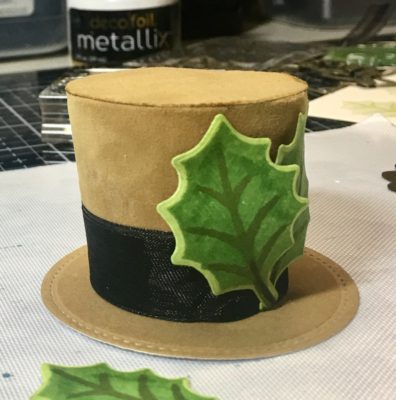
Cut a piece from a foam cone to the size you want for the top hat. You will need to either die-cut circles or trace something round to get the right size. Fortunately, I have so many different die-cut circles that I was able to simply die-cut them. The larger circle (Gina K. Designs Single Stitch Design) creates the brim of the hat and the smaller circle (random die from stash) covers the top of the foam cone.
Create a template for the hat itself by wrapping a piece of scrap paper around the piece of the cone and folding around the top edge to create a crease. Remove it and cut along the crease. Repeat this step along the bottom edge. This should be pretty close to perfect but you may need to line it up on your cone “hat” and trim just a bit. Once it’s perfect, lay it on the backside of the Flock Sheet and trace with pen or pencil and cut out with scissors.
Instead of transferring the flock using adhesive, you will simply glue the entire piece to the foam cone. Hot glue will not adhere it permanently, but it will help to hold it in place while your Ultra Bond Liquid Adhesive dries. Spread the adhesive thinly so you don’t have warped areas on your hat or areas where it seeps through. I used the hot glue only at the seam. Adhere the smaller circle to the top of the hat, lining up the edges and adhere the entire piece to the larger circle.
Hint: Don’t make the mistake I noticed when posting these pics – paint the underside of the hat brim 😉. I have since painted it to match the Tuscan Gold suede look.
Hint #2: Therm o web carries black Flock Transfer Sheets as well but I thought it would be fun to show a variation. I think this turned out to look like a really cool suede hat.
STEP THREE:
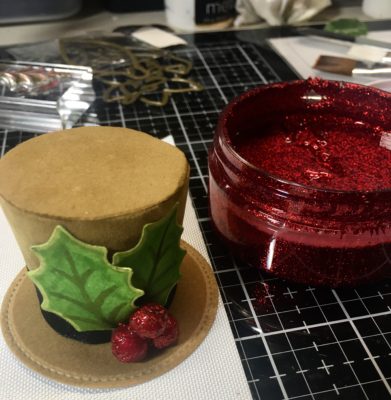
Using the Gina K. Designs Wishing You Joy Stamps and Dies, create holly leaves to adorn your hat. After creating a ribbon hatband, adhere the leaves and use some red foam balls to create holly berries, adding some sparkle with Gina K. Designs Glitz Glitter Gel. I used hot glue and Ultra Bond again to adhere to the leaves and berries to the hat.
Hint: I purchased a stem of foam berries at a local dollar store but you could replace the foam with tiny bells or pearls colored with red alcohol ink and then add the Glitz Glitter Gel sparkle.

STEP FOUR:
Adhere the foam ball (flat side up and to the side in the direction you want your hat to tilt) to the top of the candlestick. I glued some paper inside the recessed area so the ball would have a solid surface for maximum adhesion. For extra assurance, use a paper piercer to create a hole in the paper and glue a toothpick into it sliding the foam ball onto the toothpick. Adhere the hat to the foam ball. I used the same method of hot glue and Ultra Bond.
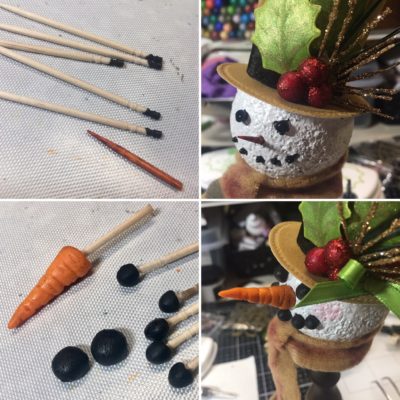
Looking at the pictures below you will see that I started to do the face one way and then changed my mind. I usually create polymer clay coal pieces and carrot nose but thought I would try Nuvo drops and toothpicks since this face was smaller. Yeah . . . that didn’t work. It looked horrible so I went back to my tried and true method. Check out the hint below for a great hack!
Create your clay pieces by molding them around the end of a toothpick. Use a paper piercer or another toothpick to create lines on the carrot nose. Once they are baked you can snip off a bit and stick the toothpick into the foam ball with Ultra Bond Liquid Adhesive. Before you adhere the toothpicks into the face of the snowman, remove the baked clay pieces (if they come off without breaking), add a bit of Ultra Bond Liquid Adhesive and place them back onto the toothpick.
Hint: Okay, here is my big hint for the day 😊: Use your heat tool to bake your polymer clay! Now I’ve never done this for larger, thicker pieces, but it works for the small bits I do. I hold the toothpicks with long tweezers and heat with my heat tool, moving it so that I don’t burn the clay. This only takes 30-45 seconds. Let the pieces cool and they will be hard as if you baked them in the oven. When you’re too lazy to run up and down the basement stairs it’s amazing the hacks you discover lol.
STEP FIVE:
Add a bit of ink or paint to your carrot nose to highlight the lines, embellish your hat with odds and ends and add a scarf.
Hint: I used a wired Christmas ribbon for the scarf and just pulled some threads at the bottom to create the fringe.
Thank you so much for stopping by and letting me share my project with you. I hope you found something to take away and inspire you.
Wendy
We’re giving you a chance to win a $30 Gift Card to use just how you’d like. Shop for all SIX new flock colors, pick up some Gina K. Designs StampnStencil items, new Brutus Monroe for Deco Foil Toner Sheets…plus tape runners! There’s always something right? Follow our Rafflecopter to get yourself entered to win!
Denice Metz
September 23, 2019 at 4:12 pm (5 years ago)Loving all the colors but need to get the ruby red and the black
Thanks for the chance
Meghan Kennihan
September 23, 2019 at 4:32 pm (5 years ago)What a fun creation! I Love this snow man! I love the Ruby Red!
Diane Osment Graham
September 23, 2019 at 8:29 pm (5 years ago)I’m torn between the Teal and Ruby Red for favorite. They are all great colors and I’d love to try them all. Thank you for giving us a chance to win.
Thank you
Sue D
September 23, 2019 at 9:28 pm (5 years ago)Cute snowman. I like the new color Teal waters.
Denise Bryant
September 23, 2019 at 10:42 pm (5 years ago)Love this awesome snowman!
Teal Waters is my favorite new color!
Mary Holshouser
September 26, 2019 at 10:16 am (5 years ago)This is darling. Can go out before the Christmas
season and stay after (there are a lot of snow days).
thanks for sharing txmlhl(at)yahoo(dot)com
Mary Holshouser
September 26, 2019 at 10:18 am (5 years ago)The emerald green will be a great color for
my Christmas projects.
txmlhl(at)yahoo(dot)com