


Hello Crafty Friends!!
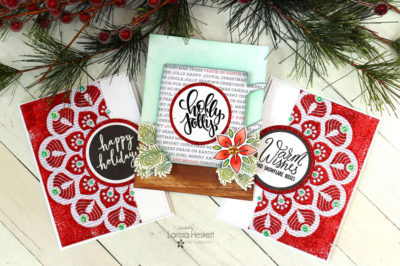
Larissa here today to share a Trio of Holiday Cards!! I LOVE being able to stretch my stash and today I’m doing just that by using Products that at first glance might not seem like Holiday-themed Products!! By changing the Color Scheme, adding a few extra elements and a Holiday Sentiment it turns them into the PERFECT Holiday Design!!
Holiday Cards to Stretch Your Stash
It’s HARD to believe, but the Holidays are approaching FAST!! So I thought it would be FUN to share a couple of ideas on designs you can create using Dies or Images you may have that aren’t even specifically Holiday-themed!!
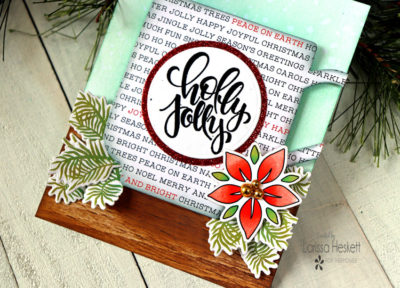
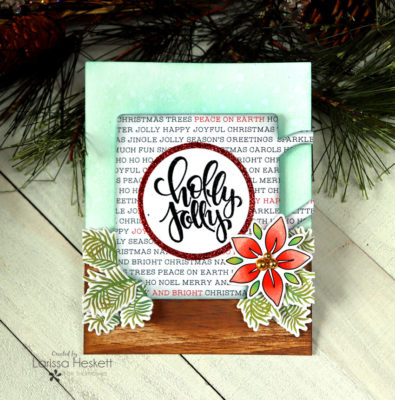
I Die Cut the Coffee Cup Die using some Pebbles Merry Little Christmas patterned Paper!! I LOVE the Simple Text Design!! Then I added some Distress Oxide Ink in Weathered Wood to add some Shading to make the Coffee Cup appear more 3-D!!
Glitz Glitter Gel
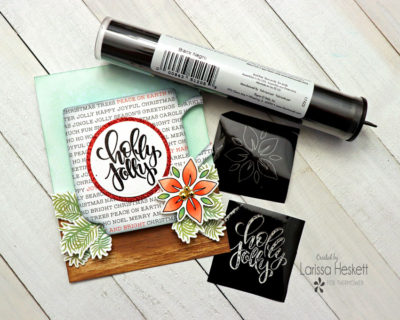
I wanted to add a Holiday Sentiment Sentiment that POPS, plus making it part of the Image just adds to the overall Design!! I added some Gink K Designs Red Glitz Glitter Gel to some Cardstock using my Stencil Pal in a thin layer and set it aside to Dry!! Once Dry I was able to Die Cut it using a Circle Die!! I then Die Cut a Stitched Circle Die Cut and Stamped and Embossed a Gina K Designs Sentiment from the Gina K Designs Stamp-n-Foil Holly Jolly Stamp Set and added it to the Center of the Coffee Cup Die Cut after Foiling it with some Black Deco Foil by running it through the Laminating Machine!!
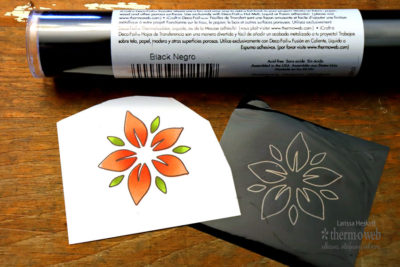
StampnFoil
I also Foiled the Poinsettia Image from the Gina K Designs StampnFoil Foil-Mates Details Sheets from the Holly Jolly Set using Black Deco Foil by running through my Lamination Machine!!
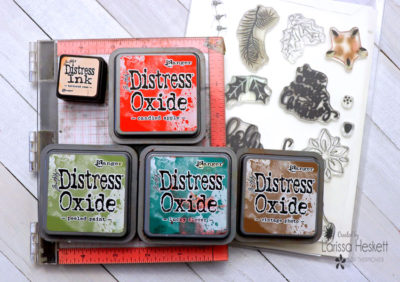
I then Stamped the Poinsettia Image using the coordinating Stamps from the Gina K Designs Stamp-n-Foil Holly Jolly Stamp Set using Distress Ink in Tattered Rose, and Distress Oxide Inks in Candied Apple, Peeled Paint, Lucky Clover, and Vintage Photo!! I used the same Green and Brown Inks to create the Pine Needle Images also from the same Stamp Set and then used the coordinating dies Gina K Designs Stamp-n-Foil Holly Jolly Die Set to die cut them all out!!
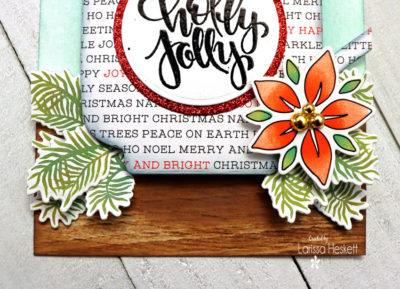
I layered the Pine Needles behind the Coffee Cup Image, layering them to create some Dimension and then added the Poinsettia Image to the Side of the Coffee Mug!! A few Gold Pearls finished off the Design!!
Products Used:
Therm O Web:
Deco Foil Transfer Sheets in Black
Laminating Machine
Zots Bling Adhesive Dots
Memory Tape Runner XL
Gina K Designs Stamp-N-Foil Holly Jolly Stamp Set
Gina K Designs Stamp-N-Foil Holly Jolly Die Set
Gina K Designs Stamp-N-Foil Mates Detail Sheets Holly Jolly
Gina K Designs Red Velvet Glitz Glitter Gel
Stencil Pal
Pixie Spray
Gina K Designs Luxury White Cardstock
Gina K Designs Foam Squares
Other:
Picket Fence Studios Coffee Cup Die
Mini MISTI Stamping Tool
Pebbles Merry Little Christmas Patterned Paper
Studio Katia Gold Pearls
WoW Clear Gloss Embossing Powder
Versa Fine Black Onyx Ink
Distress Oxide Inks in Tumbled Glass, Cracked Pistachio, Candied Apple, Peeled Paint, Lucky Clover and Vintage Photo
Distress Ink in Tattered Rose
Happy Holidays Cards
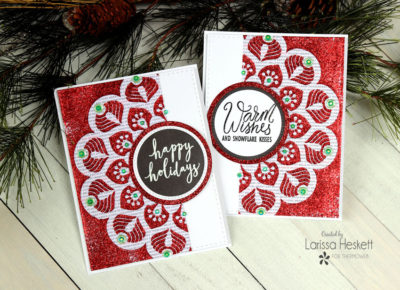
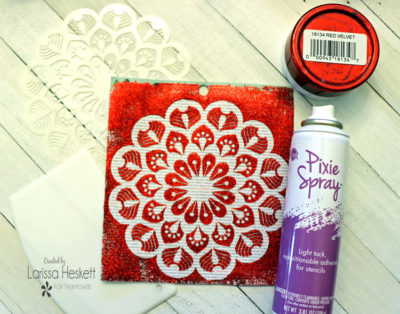
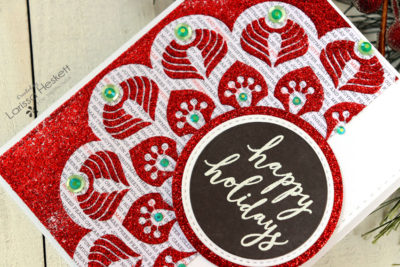
My next 2 card showcases how you can use Stencils in MANY designs, even if they’re not specifically Holiday Themed to create some very ELEGANT Holiday Cards!! The NEW Picket Fence Peacock Mandala Stencil is a GREAT example because it really doesn’t SCREAM Holiday, but by the pairing it with Holiday Colors and turning it into more of a Snowflake Image, I think it makes for a very ELEGANT Holiday Card that would be VERY simple to make multiples of because one Stenciled images create 2 Cards!!
Pixie Spray
I Started by Spraying the backside of the Stencil with some Pixie Spray and then adhered it to the Pebbles Merry Little Christmas Patterned Paper!! I then took the Stencil Pal and applied some Gina K Designs Red Velvet Glitz Glitter Gel and spread a thin layer of it across the entire stencil and Patterned Paper!! I then removed the stencil and washed both the Stencil Pal and Stencil and set them aside to dry!!
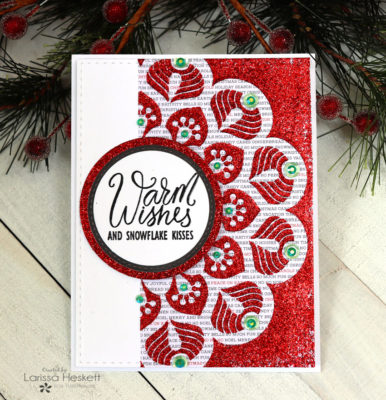
Once the Stenciled Design was Dry, I used my Paper Trimmer to cut it in half!! This is how you’re able to create 2 Cards from one stenciled Design!! I adhered it to a Stitched card panel and then adhered it to an A2 Cardbase!!
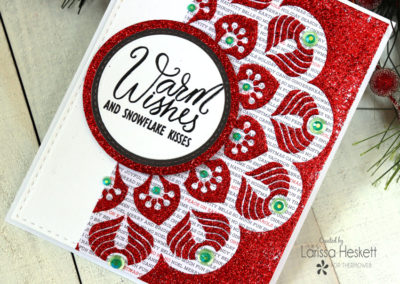
I wanted to add a POP of Green to give the Design a more Holiday feel, so I used some 8mm Sequins and added them along the top part of the Stenciled design!! Then I added some Green Jewels to the center of the Sequins using some Zots Bling Adhesive Dots!! I also added some Jewels to another part of the Stenciled Design using the same Zots Bling Adhesive Dots!!
StampnFoil Baby It’s Cold Outside
I Stamped and Embossed my Sentiment from the Gina K Designs Stamp-n-Foil Baby it’s Cold Outside Stamp Set and then backed it with some Gink K Designs Red Glitz Glitter Gel that I added to some Cardstock using my Stencil Pal in a thin layer and set it aside to Dry!! Once Dry I was able to Die Cut it using a Circle Die!! I adhered them together and used some Gina K Designs Foam Tape to the front of the Card Panel!!
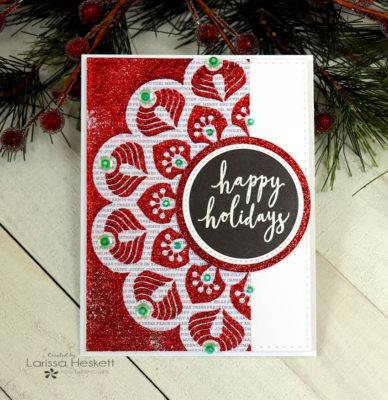
I used the other half of the Stenciled Design to create another Card!! just switching the orientation!! I repeated all of the same steps as above, except I decided to Stamp and Emboss the Sentiment from the Gina K Designs Stamp-n-Foil Baby it’s Cold Outside Stamp Set onto Black Cardstock and embossed it with WoW Gloss Embossing Powder!!
Gina K. Designs Foam Tape
I backed it with some Gink K Designs Red Glitz Glitter Gel that I added to some Cardstock using my Stencil Pal in a thin layer and set it aside to Dry!! Once Dry I was able to Die Cut it using a Circle Die!! I adhered them together and used some Gina K Designs Foam Tape to the front of the Card Panel!!
Products Used:
Therm O Web:
Zots Bling Adhesive Dots
Memory Tape Runner XL
Gina K Designs Stamp-N-Foil Baby it’s Cold Outside Stamp Set
Gina K Designs Red Velvet Glitz Glitter Gel
Stencil Pal
Pixie Spray
Gina K Designs Luxury White Cardstock
Gina K Design Black Onyx Cardstock
Gina K Designs Foam Squares
Other:
Picket Fence Peacock Mandala Stencil
Mini MISTI Stamping Tool
Pebbles Merry Little Christmas Patterned Paper
Pretty Pink Posh Sequins and Jewels
WoW White Gloss Embossing Powder
Versa Mark Embossing Ink
So there you have it a Trio of Holiday Card Ideas that Pack a Punch in both Dimension and Sparkle!! I hope you feel INSPIRED and that you’ll look at some of the Products you may already own that aren’t necessarily Holiday Themed and Combine them with other Products from your stash to create some Holiday Cards!!
THANKS SO MUCH for stopping by today and STAY TUNED for LOTS of FUN as we SHARE LOTS of ideas this week during the X-Mas in August Week!!
Thanks so much for stopping by today!! We would love to see what YOU create with the Deco Foil Products – be sure to use #decofoil and #thermoweb on Social Media!!
tsurutadesigns1
December 22, 2019 at 7:40 am (4 years ago)Larissa! These are all AMAZING. I’m going to share your fabulous Mug card in the Coffee Loving Papercrafters FB page!