


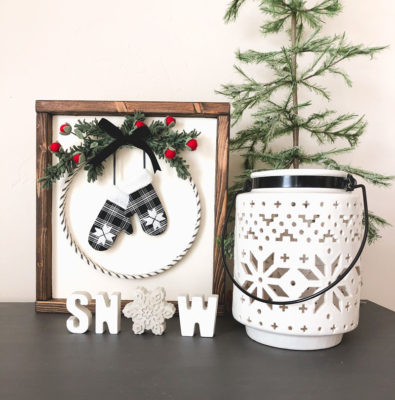
Hello there friends! It’s Amy from Ameroonie Designs here again! Do you ever wonder what to do with your decor in that in-between time after Christmas but before you are ready to go full-on Valentine’s day decor? I am always ready for a simpler take on my decorations, but I still want to create a space that is warm and inviting. Especially now that I live in a place where it is cold and snowy for half of the year. This Snowflake Mitten Hoop is a fun weekend project that adds a bit of warmth and whimsy to your winter decor.
Snowflake Mitten Hoop Tutorial
Supplies:
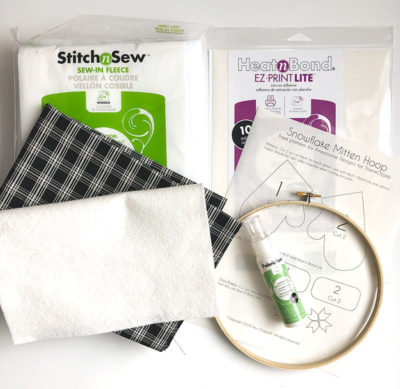
- Snowflake Mitten Hoop Pattern
- Heat n Bond EZ print lite or Heat n Bond Lite
- White or cream felt
- Fabric for mitten
- 8″ embroidery hoop- I only used the outer ring of the hoop and will save the inner ring for another project
- Fabric Fuse Liquid Quick Bond Adhesive
- Stitch n Sew Sew-in Fleece (optional, you could always just use more felt, but I like the loft of the fleece for the mittens)
Prepare Mitten Pieces
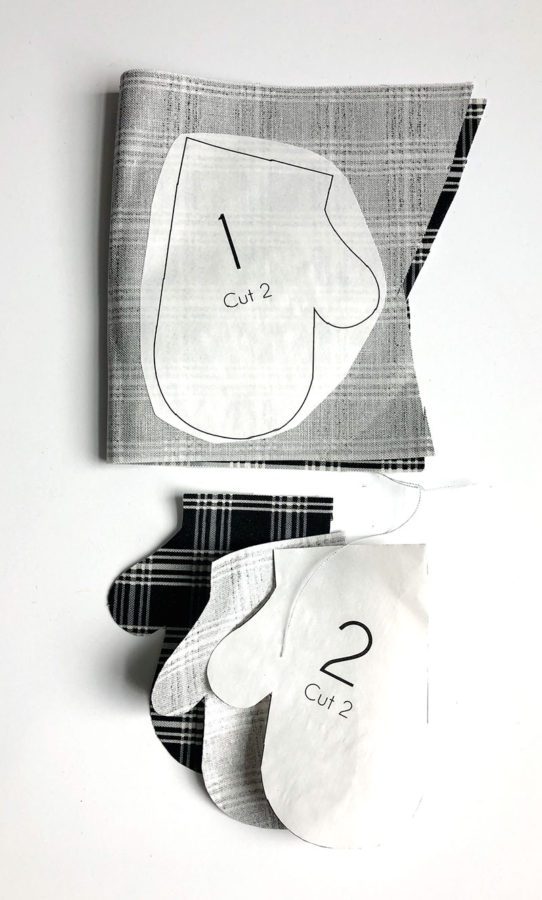
Print off your pattern. If you did not use the EZ print sheets, trace your mitten shape onto Heat n Bond Lite. Next, cut out the mitten patterns leaving a slight margin around. Fuse the pattern onto the back of the fabric you will use for the mitten.
PLEASE NOTE: you need to cut 2 copies of each mitten from the fabric. One will have Heat n Bond Lite, the other will NOT. It is easiest to do this by folding the mitten fabric in half, right sides together. Fuse the Heat n Bond to the back of the folded fabric, then cut around the pattern. You might find it helpful to pin the layers together as you cut.
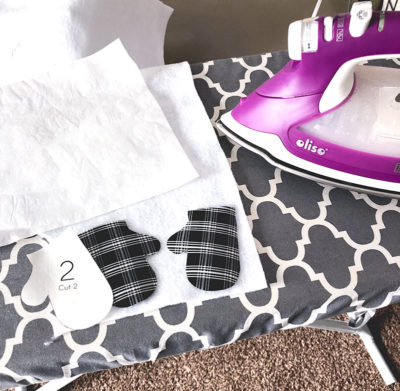
Take the two mitten pieces with Heat n bond Lite on them and fuse them to your Stitch n Sew Sew-in Fleece. I recommend using pressing or parchment paper to protect your iron as you do this. Then, cut around each mitten shape.
Prepare Felt Pieces
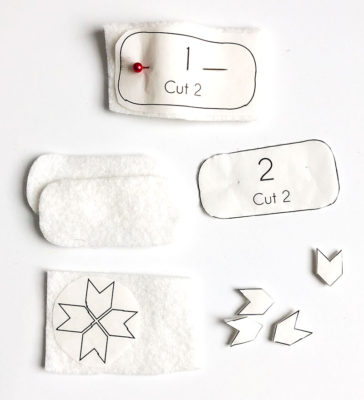
If you did not print your pattern onto Heat n Bond EZ Print Lite sheets, trace your snowflakes onto Heat n Bond Lite. Cut out your cuff patterns from either paper OR the EZ print Lite sheets and cut your snowflake patterns out. Leave a slight margin around all the pattern pieces. Pin the cuff pieces to a double layer of felt, this will allow you to cut both pieces for each mitten at once. DO NOT fuse the EZ print Lite to the felt! Cut out the cuff pieces- there will be two of each side. FUSE the snowflakes to your felt. If you are not using a wool blend felt, you will need to use a press cloth or parchment paper to protect the felt from melting. Cut out your snowflake pieces. Remove the paper backing and set aside.
Create the mittens
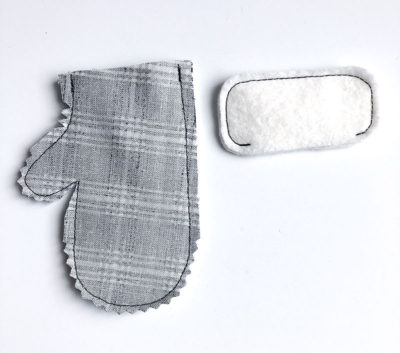
Place your mitten and cuff piece right sides together. Sew around your mittens leaving the top straight edge open. Use a very scant 1/4″ seam allowance. Clip a notch into the corner where the thumb joins the mitten as well as clipping notches around all of the curves.
Sew around the cuff pieces using a 1/8″ seam allowance. Start just before the curve on the bottom and end just after the last curve, also on the bottom. You may want to wait until you have turned your mitten right side out so you can mark this opening to make sure it is large enough to cover the top of the mitten when assembling. Backstitch at the beginning and end of your stitching.
Turn both the mitten and the cuff right side out. Be patient as the mitten is a bit of a tight fit. Use a blunt tool such as a chopstick to help push out the edges of the seams. Press the mitten well. Use your fingers to press out the cuff, you do not need or want to press it with the iron.
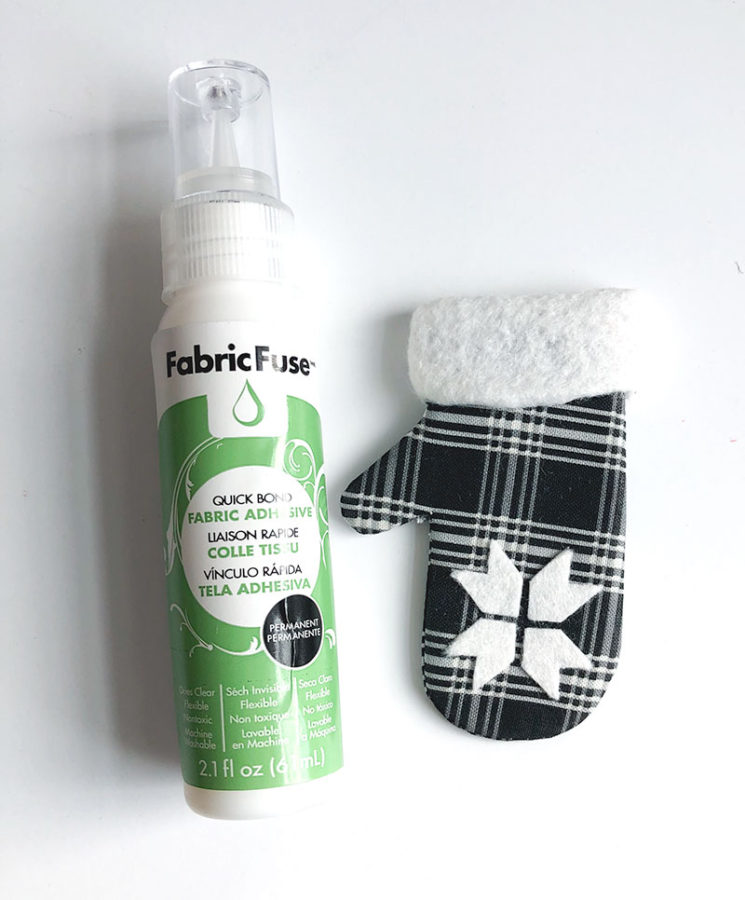
Next, you will want to position the snowflake as desired and fuse into place. Again, remember to use a cloth or parchment to protect both the felt and your iron.
Slide the cuff over the top of the mitten until the top of the mitten is lined up with the top of the cuff. Turn under the seam allowance of the opening on the bottom of the cuff. It may take a bit of time to make sure the cuff bottom is straight and even. Finger press the seam allowance where you want it and then use the FabricFuse to glue the bottom of the cuff in place. Allow to dry.
Finishing the Hoop

Now you can finish your hoop! I wrapped the outer ring of my embroidery hoop with a 1″ strip of fabric, gluing the end in place when the entire thing was wrapped. You could also paint, stain or just leave the hoop natural. Attach some ribbon to the corners of the mittens- I just used hot glue. *One tip is to angle the ribbon so the mitten hangs how you would like it to. Try pinning it in place and adjusting before you commit to the glue.
Hot glue the mittens onto the hoop and add greenery. I used felt to create pine boughs and berries, but you could always use greenery found at a craft store. The video tutorial for making felt pine boughs and berries can is available on my Instagram page under the highlights- Felt Pom flowers (berries) or Pine Boughs. If you are placing the hoop in a frame, as I did, I recommend putting the hoop in the frame before adding the greenery.
I just love these tiny mittens and I can’t wait to put them into my winter decor! How do you cozy up your home after the holidays? I would love to hear your suggestions! Happy Sewing friends! xoxo, Amy
4 Comments on Snowflake Mitten Hoop Home Decor
3Pingbacks & Trackbacks on Snowflake Mitten Hoop Home Decor
-
[…] in my entry way is coming together! You can find the tutorial for the snowflake mitten hoop on the ThermOWeb blog here, and the Snow Globe pillow will also be found on the ThermOWeb blog as well. The black and white […]
-
[…] Globe Applique pillow is a fun winter decoration you can use the whole season. Pair it with your mitten hoop and you have a delightful combination for anywhere in your home. This fun pillow finishes at […]
-
[…] Globe Applique pillow is a fun winter decoration you can use the whole season. Pair it with your mitten hoop and you have a delightful combination for anywhere in your home. This fun pillow finishes at […]
Carmen Montmarquet
December 27, 2019 at 4:10 pm (4 years ago)This is adorable, thanks so much for sharing!!!