


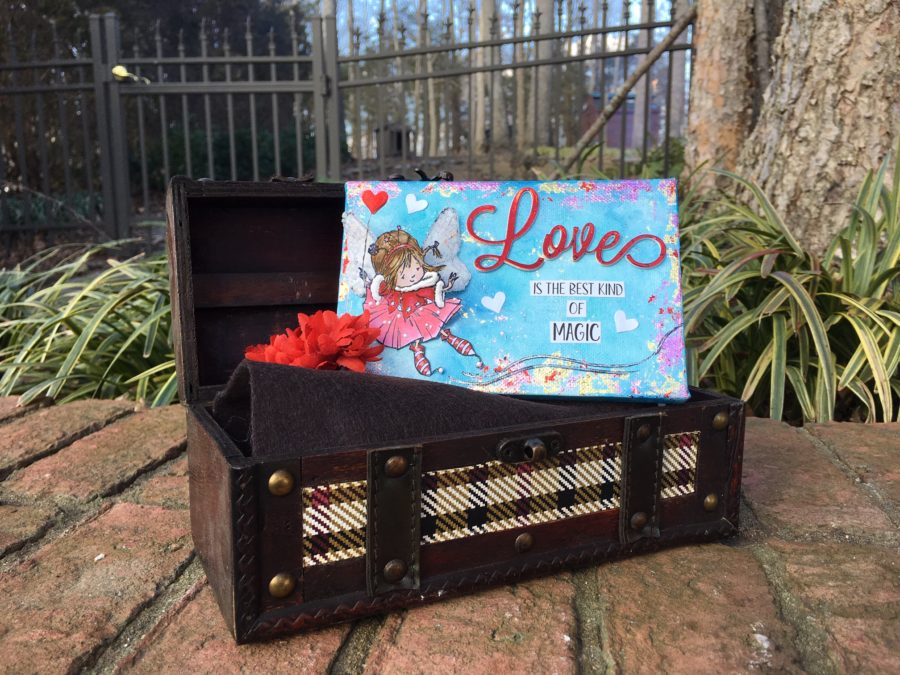
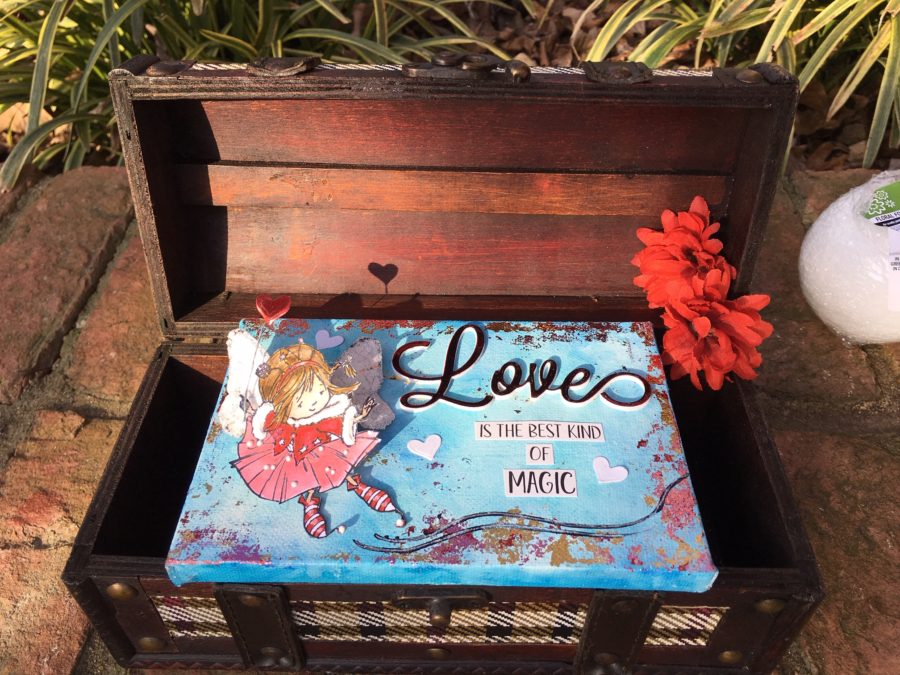
Valentine Themed Mixed Media Canvas
Happy February! Wendy here with a fun mixed media canvas using a Whimsy Stamps image. Scroll down to see how I took a 2D image and created a 3D embellishment for my Valentine themed project and amped it up with Foil.
Supplies:
Deco Foil Transfer Sheets – Gold, Red and Pink
Deco Foil Peelnstick Toner Sheets
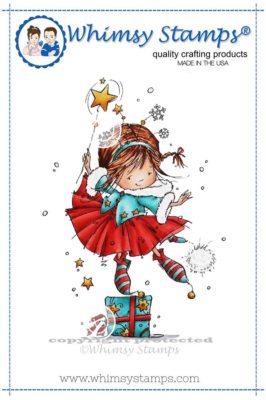
Whimsy Stamps Rubber Stamp – Ruby’s Christmas Wish
Other Supplies: Stamp ink, mixed media or watercolor paper, pens or paints for coloring image, Nuvo Drops (white), craft wire, craft butterfly (or die-cut), 4×6 canvas, alcohol inks, blending solution, paintbrush, “Love” die, heart die, die-cutting system, printed sentiment, cardstock,
Valentine Canvas Instructions
Step One:
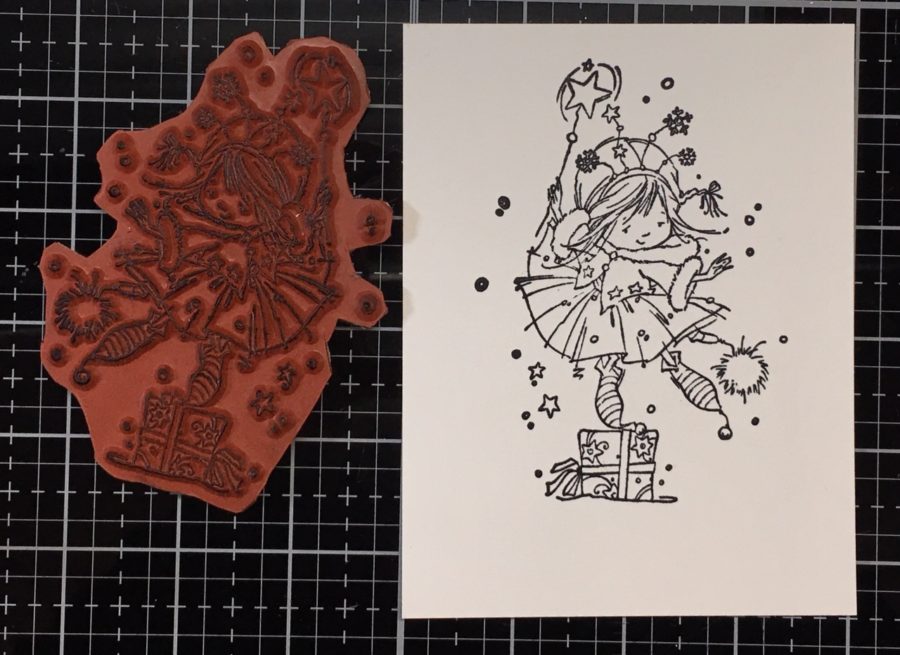
Stamp image onto mixed media or watercolor paper (these will work better for coloring (vs. cardstock) unless you are using a dry medium such as colored pencils). I used Distress Inks for coloring my image and added white Nuvo Drops to the fur areas. This image is a Christmas image but I loved it so much I knew I could modify it to use for a Valentine Theme.
Hint: If you find a stamp image you really like but it’s themed, try doing what I’ve done and modify it. Below I add to the image to blend it with my theme.
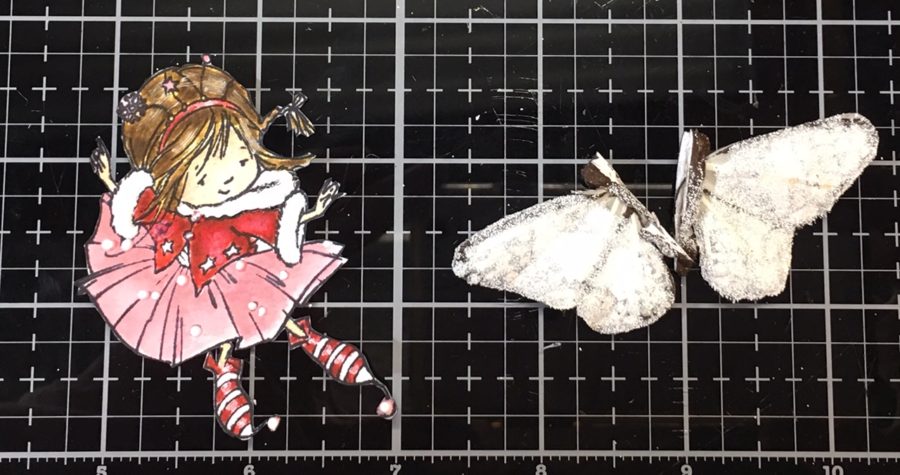
Step Two:
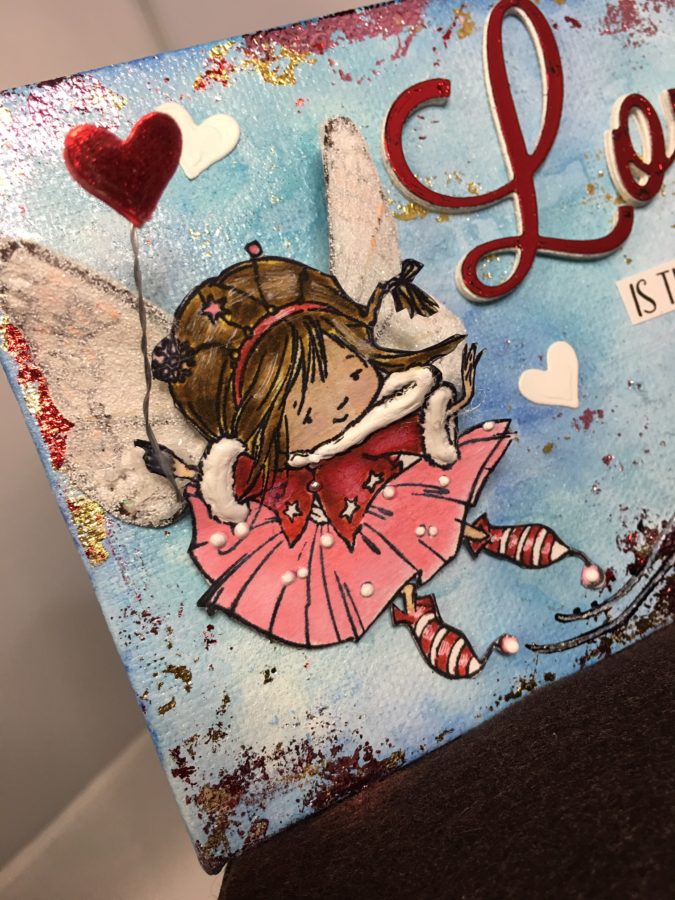
Once my image was colored, I fussy cut around it (cutting off the snowflakes and star wand). I used a craft butterfly to add wings to my image. Adhere using Ultra Bond Adhesive to ensure a strong bond.
Hint: If you don’t have a craft butterfly, use die-cut wings instead.
Step Three:
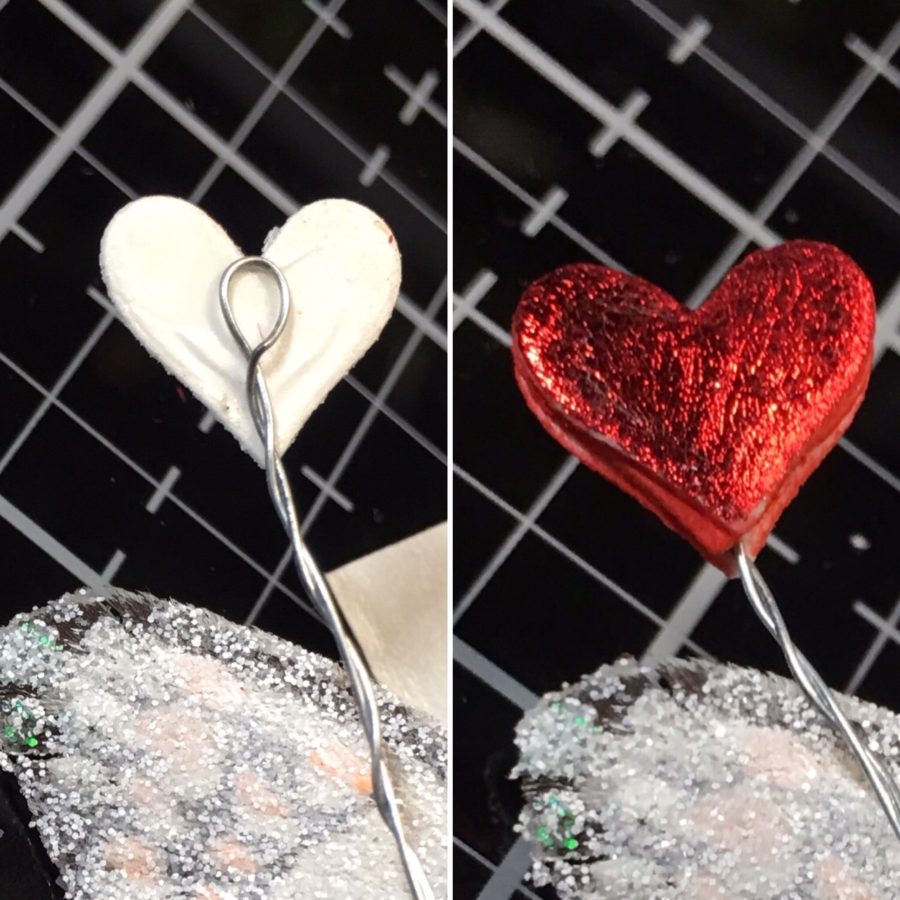
Create a new wand for your Valentine Fairy by die-cutting a small heart from White Foam Adhesive (twice). Because the foam is stick on both sides, you can sandwich a small piece of craft wire between the two hearts and still have sticky on the outside of the hearts. Peel the release paper from the outside of the hearts (one at a time) and press a red Foil Transfer Sheet, dull side down against the sticky heart, and press it onto the foam. When you peel it away you will be left with a shiny red heart wand. Die-cut a few extra white hearts to use as accents on your canvas.
Tip: In the absence of White Foam Adhesive, try Deco Foil Peelnstick Toner Sheets and use them the same way (except you will need to use your foiling machine to foil the toner hearts – see instructions below).
Step Four:
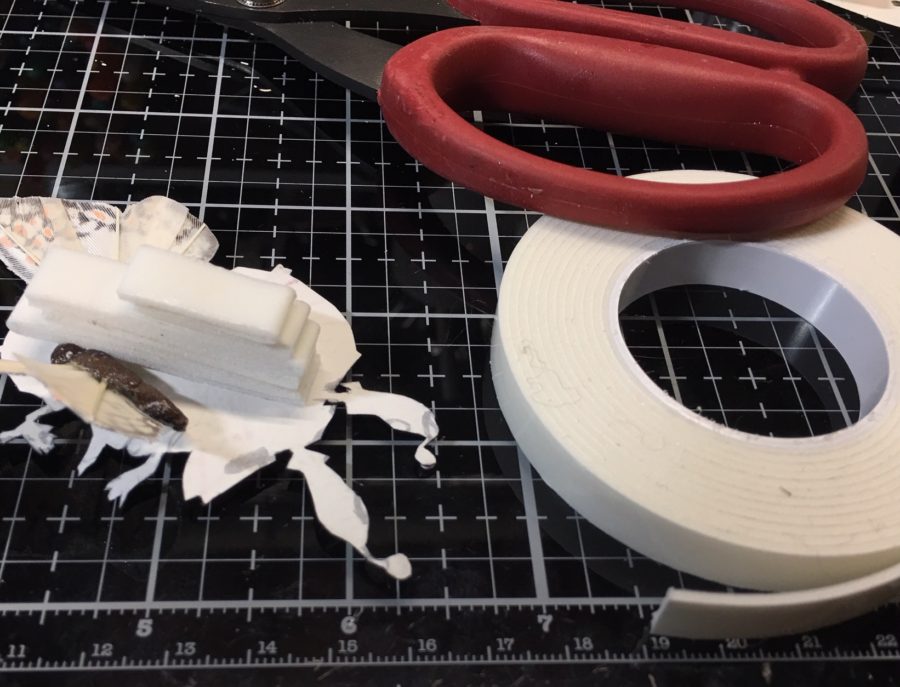
Stack a few layers of Foam Tape on the back of your fairy so that she will be lifted away from the canvas and leave room for her wings to tilt back. Set her aside while we prepare the canvas.
Hint: If you don’t have the Foam Tape, use iCraft Foam Squares or cut strips of White Adhesive Foam.
Step Five:
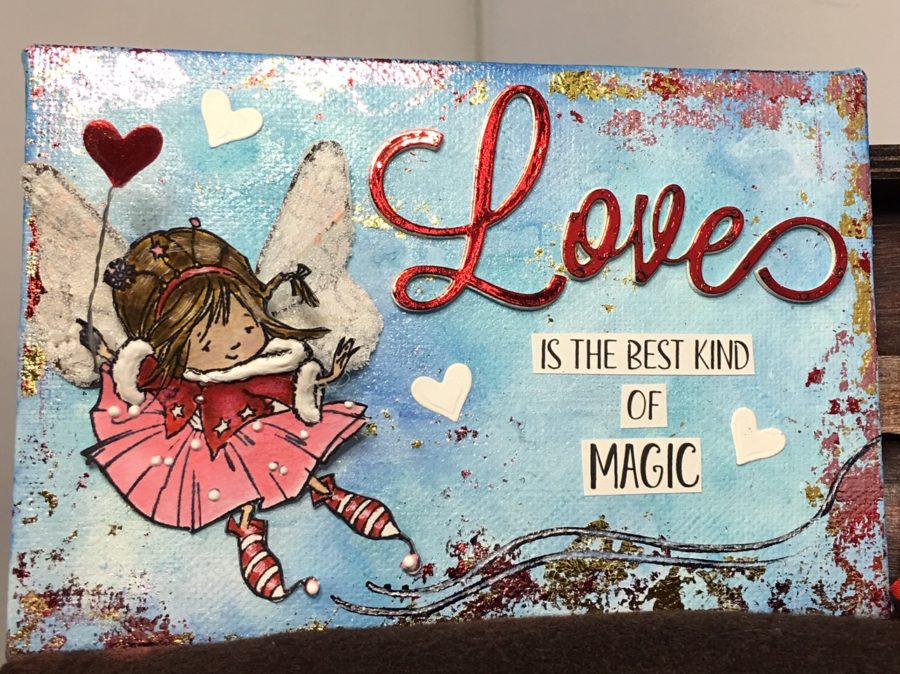
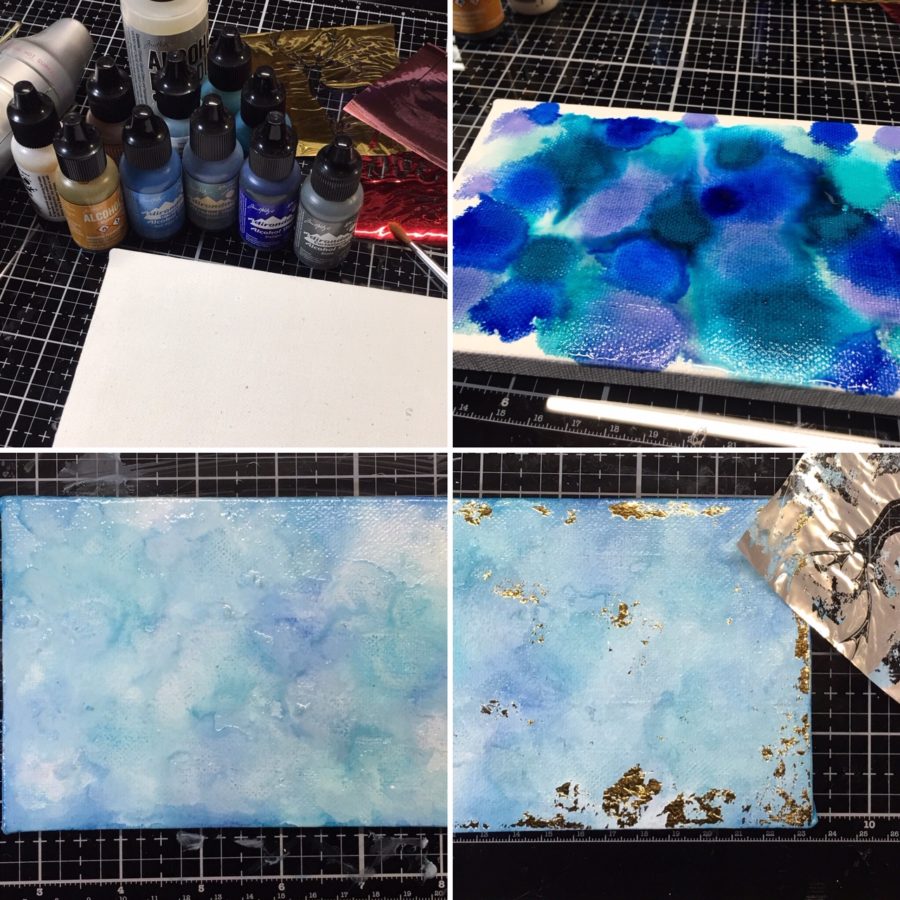
Prepare your canvas by painting on a layer of gesso and letting it dry completely. Once it is dry, add an ample amount of Alcohol Blending Solution to the canvas and quickly add drops of blue alcohol inks in different tones and shades. Use either a heat tool or a straw to blend the colors. You will most likely need to add more Blending Solution on top so that it moves better. Add white alcohol ink mixative along with more blending solution to create a cloud-like texture and look.
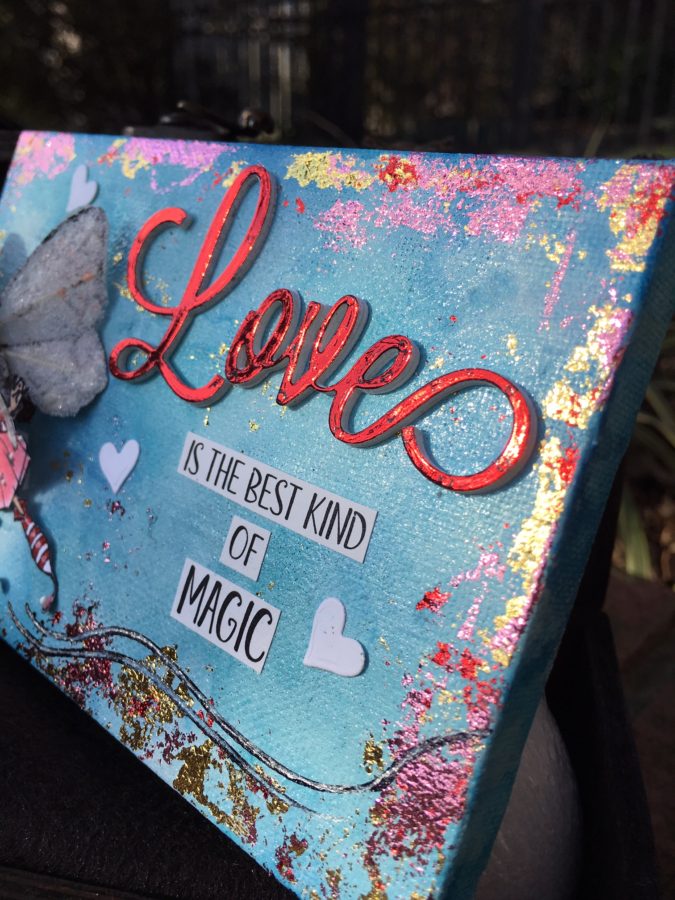
Before the alcohol ink is completely dry, press scrap pieces of Deco Foil Transfer Sheets along with the edges and sparingly to the center of the canvas to accent. I used red, pink and gold Foil.
Hint: If you don’t have alcohol inks you can achieve a similar look using watercolors or acrylic craft paints. For these mediums, you will need to use an Deco Foil Adhesive Pen to add your foil accents.
Step Six:
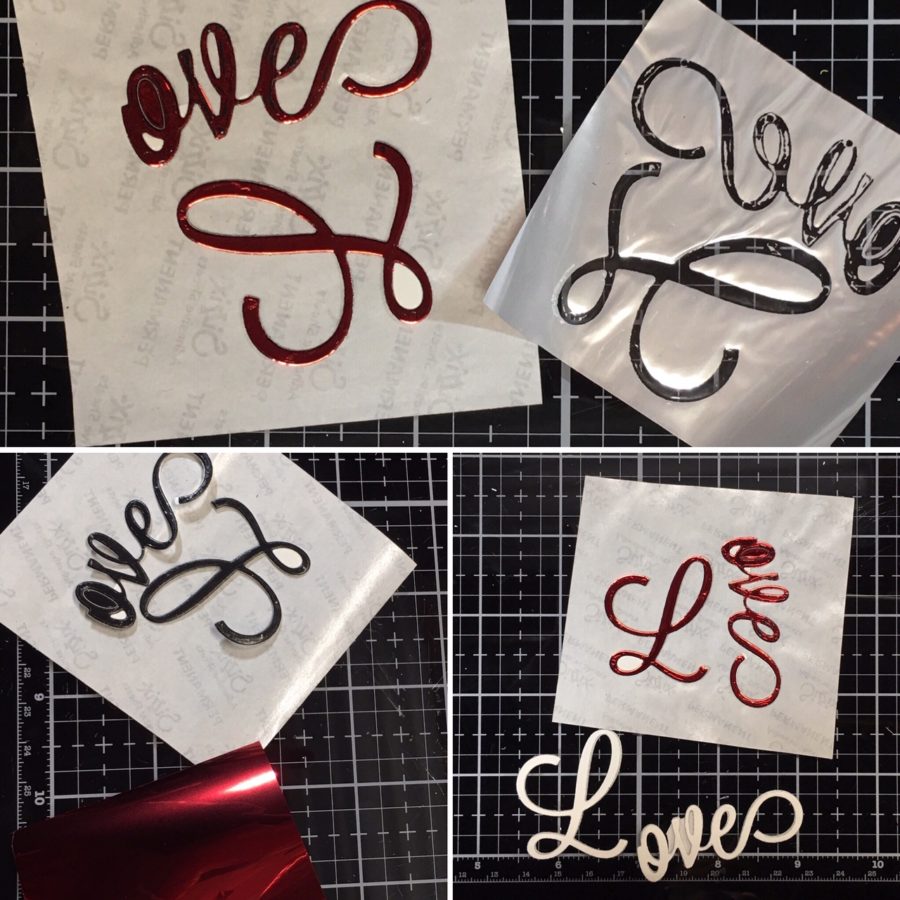
Die-cut the word “Love” from a Peelnstick Toner Sheet (bottom left image) and place into a Foil Laminator carrier sheet toner side up. Place a piece of red Transfer Foil over the die-cut, dull side down and close carrier. Carefully feed the carrier through the Foil Laminator and Voila! You have a foiled sentiment. The Deco Foil Toner Sheets are one of my favorite products because you can die-cut ANY image and foil it.
Finish your sentiment by typing and printing “is the best kind of magic” and the font of your choice. Cut the words apart and set aside to use on your canvas.
Tip: Die-cut the word “Love” from cardstock several times and layer them with the foiled one on top to create an ultra-dimensional embellishment.
Step Seven:
Assembly. Lay your pieces out on your canvas before adhering them to make sure you have all of your elements spaced the way you want them and then adhere your sentiment down. Add your Valentine Fairy, adding extra adhesive where needed to make sure she is propped up and bonded securely. Adhere the heart wand to her hand using Ultra Bond Adhesive. Finish your canvas by adding in the extra white hearts you die-cut when you die-cut the wand topper.
Tip: Propped a small cap under the wand top until the adhesive on the fairy hand dried completely to make sure it would not shift from where I placed it.
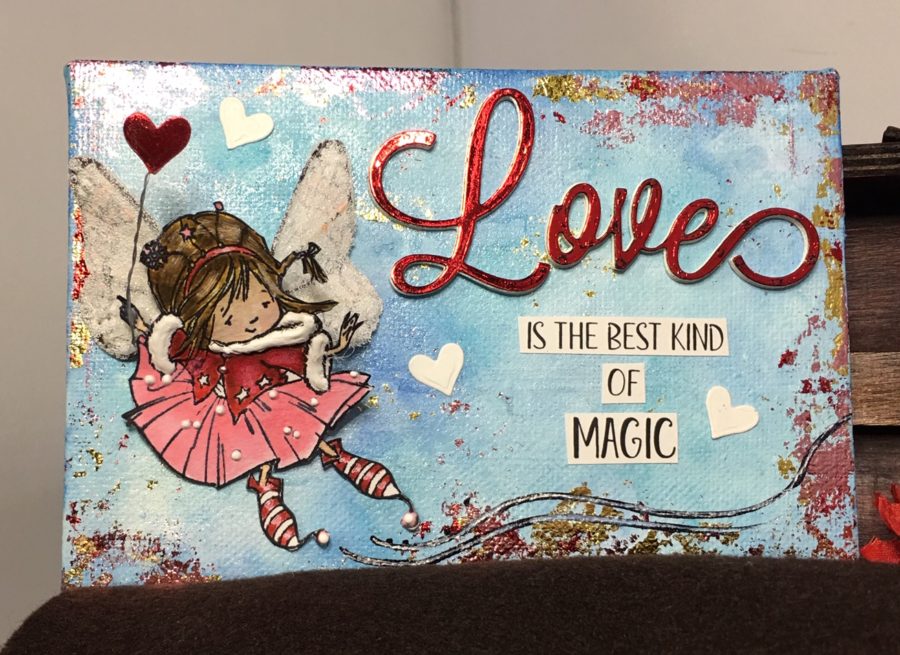
The below picture shows the dimension you can achieve by layering your die-cuts.
I had a blast using this image (and I can’t wait to use it again and again for different fairy themes as well as for Christmas!). I hope you will look at your stamps and stamps you’re considering purchasing with an eye to modification. Whenever I buy stamps I ask myself “What else can I do with this?” and I can usually find a way to use all or part of the image in a whole new way.
Happy Valentine’s Day!
We hope you’re enjoying this week and finding new ideas and inspiring way to use our two companies products!
To celebrate the fun collaboration this week we’d like to give YOU a chance to win some goodies from ThermOWeb!
You can select from adhesives, Deco Foil, Gina K. Designs products and much more!
Simply follow the easy to use Rafflecopter to get entered to win! Then visit our friends at Whimsy Stamps for more inspiration and chances to win all this week!
a Rafflecopter giveaway
trainwithmeghan
February 6, 2019 at 9:02 am (5 years ago)THIS IS AMAZING!!!!!!!!!!!!!!!!!!!!!! Beautiful job!
Deborah Davis
February 6, 2019 at 9:28 am (5 years ago)This card is awesome! What a great combination of Whimsy Stamps and ThermOweb products!
Helen Gullett
February 6, 2019 at 10:24 am (5 years ago)That is one super sweet, adorable and amazing mixed media canvas. I love the stamp, the foil, and that background. Simple yet full of textures. Great project today!
Denise Bryant
February 6, 2019 at 11:54 am (5 years ago)Adorable mixed media canvas! Love the sweet fairy and the colors! Charming!
Mary Holshouser
February 6, 2019 at 1:15 pm (5 years ago)Love the depth to the little fairy.
Darling piece. I’d love to have it
in my house – to make me smile
when I was down.
. thanks for sharing
txmlhl(at)yahoo(dot)com
Sue D
February 6, 2019 at 9:03 pm (5 years ago)Fabulous–thanks for sharing how you made this.
beccab33324
February 7, 2019 at 8:46 am (5 years ago)This is stunning and so very beautiful.
Brigitte Dumas
February 7, 2019 at 1:11 pm (5 years ago)WOW, the background is out of this world!!!!! It looks like she’s floating right at me, amazing effect.