


When we found out we were expecting our second child I was so excited to have my little Sister-in-Law (Meg Taylor Bronson Photography ; https://www.facebook.com/MegTaylorBronsonPhotog) take some maternity shots for us. I immediately made a Pinterest board for fun maternity shots especially ones that incorporated the very proud big brother!
I had her position us so I could add some text in Photoshop before printing the photos. I love how the photos turned out!
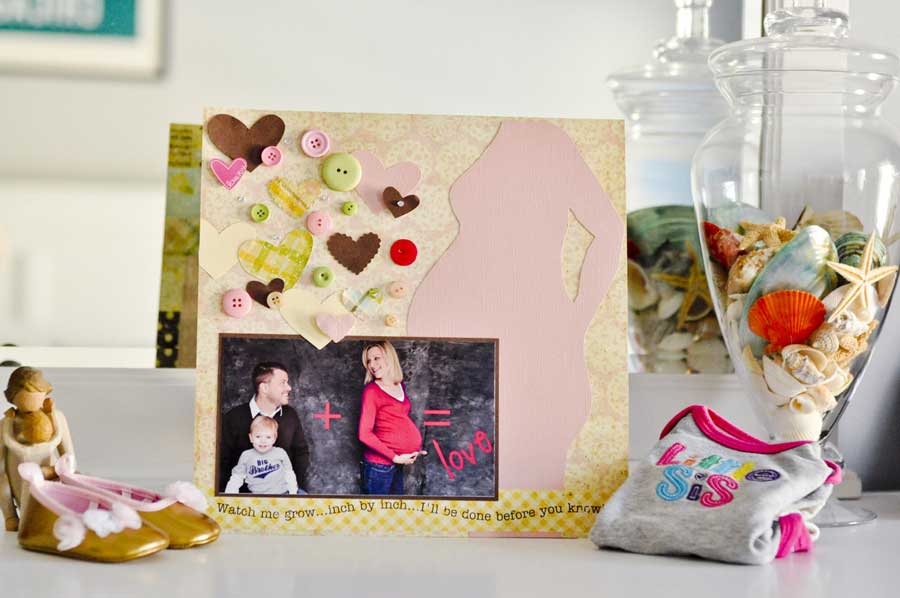
I also had a pregnant woman die-cut that I have had for YEARS! Seriously…I’ve moved it with all my scrapbook stuff to 4 houses! I traced this die-cut for a series of trimester layouts when I was expecting my son and I “trimmed” down the belly to match my belly.
Watch Me Grow – Maternity Layout By Candace Kos
Supplies:
Therm O Web Sticky Dot™ Runner
Therm O Web Foam Squares
Therm O Web iCraft™ Adhesive sheets
Therm O Web Lots O Zots™ Medium
Therm O Web Lots O Zots for Bling™
Patterned Paper – Simple Stories – Baby Steps line
Cardstock – Bazzill Basics
Cricut® – Doodlecharms™
Rhinestones – Hero Arts
Heart Sticker – Pebbles Inc.
Buttons
So, I wanted to incorporate this wonderful die-cut into my new layout about my daughter’s impending arrival. I started by selecting some wonderful pattern papers from Simple Stories Baby Steps line (http://simplestories.typepad.com) and coordinating cardstock colors from Bazzill. And then gathered other materials like my Therm O Web Lots O Zot boxes, Sticky Dot Runner, Foam Squares and my iCraft adhesive sheets.

Directions:
1. I traced the die-cut onto the back of the pink cardstock and extended her “legs” so they would reach the bottom of my layout and then carefully cut her out. I just used scissors, but you could also use an Exacto knife and glass mat.

2. I mounted the pregnant belly die-cut onto the patterned paper using my Sticky Dot Runner, then cut out a fun phrase strip from a coordinating paper from the Simple Stories Baby Steps collection and adhered that to the bottom of the layout. I matted my maternity photo onto dark brown cardstock and adhered that, slightly overlapping the phrase strip, onto the layout.

3. Next I adhered iCraft™ Adhesive Sheets to the back of some coordinating pattered paper and brown and pink cardstock. I ran them thru my Cricut® machine to cut out a variety of hearts (I used my Doodlecharms cartridge). Using iCraft™ Adhesive right thru the machine means I don’t have any tedious gluing! All the cut out shapes immediate become stickers…I just have to peel off the back liner and place them on my layout! What a time savings!

4. I started adhering the cut out hearts to the layout in a random fashion and popped a few of them up with Foam Squares to add visual interest. Lastly, I filled in any void space by added buttons and rhinestones using Lots O Zots in Medium and Bling sizes. Luckily, I had a small helper who loves crafting and buttons! He wanted to use all the red buttons, but he was willing to switch when I pointed out that the pink and green would match better…hahah!

I love how quickly this layout came together and how it really focuses on the beautiful aspect of those final months of anticipation. I hope you are inspired to take the time to celebrate those beautiful baby bellies!
Happy Crafting!
Candace
Brenda Nugent
September 28, 2013 at 6:03 pm (11 years ago)My son and his girlfriend are expecting their first baby (and my first grandchild) in December. I had asked them to take weekly pictures of the growing “baby bump” so I could put together a scrapbook for them. This page is perfect for what I am planning. Thank You!
admin
September 30, 2013 at 11:48 am (11 years ago)Many congrats to you Brenda and we’re glad to be able to help you with that special memory for your scrapbook!